Table of Contents
Intro
These are some notes on KI’s Managed File Transfer service, in addition to the official documentation.
FAQ: Is it secret? Is it safe?
Yes.
Or more specifically:
- the system requires 2-factor authentication of all users, so we can be certain that the people we are sharing with are who we think they are.
- the transfer of data to and from the MFT server is as safe as you doing business with your bank, or reading your medical journal at 1177.se — it is done with up-to-date methods to encrypt internet traffic.
- the data is stored physically at KI (the server and disks are located in KI:s server halls), so the data cannot be accessed by government agencies in countries that are not following GDPR guidelines.
Of course, all this assumes you take reasonable precautions, too — if you share a document with someone that is not following GDPR, or the DTA that you have had them sign, then no amount of technology will help …
FAQ: When should MFT be used? And not?
MFT is for transferring files, only. Files and folders are available to the recipient for 30 days, and then deleted. So — when you are sending files to someone, and needs to do so securely; or when you need to let someone send you files.
If you need to share a file or folder for a longer time, or work together on something, use OneDrive. And if you make sure that the external users are using multi-factor authentication, it is safe enough for GDPR compliance, too. You will also need to make sure that you remove any sensitive data when it does not need to be shared anymore.
Logging in as a KI user
Before you log in for the first time, you must set up the Authenticator for your KI account, per the instructions on KI:s web.
You access the service by navigating to https://mft.ki.se and logging in with your KI email adress and the password for your KI account. You will then need to sign off in MS Authenticator — and you will not be prompted for this by the login dialog.
Logging in as a non-KI user
How you (as a KI user) invite someone outside KI, and the registration process for the non-KI user, is described here on KI:s web.
Best is to set up the authenticator app before starting, i.e. before clicking the Register here link/button in the invitation email. Note that you don’t have to use the Microsoft Authenticator — other similar (TOTP) authenticators should work, e.g. the Google Authenticator.
Subsequent logins works the same way as for a KI user: enter the email adress and the chosen password, and if/when prompted, enter a one-time pass-code from the authenticator.
Sharing a document
First you need to have something to share, so upload a document, or a folder. You can also create folders, to make structure, and later add files to them.
- Click the little green cogwheel next to the file or folder. DO NOT use the top menu Share button (more below).
- Fill in who to share it with. Either emails, or you can choose from the contact list, by clicking the three dots to the right.
- Give the share invitation a Subject line.
- Optionally, you can send a message with the invitation, and you may also share the file with an alias, if you wish.
- Check the permissions. NOTE that the default permissions allow the other person to change the shared file/folder. This may not be what you intend.
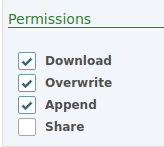
Uncheck Overwrite and Append to let the recipient access the file, but stop them from altering it.
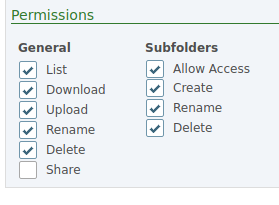
Uncheck all but List and Download under the General headline, and all but Allow Access under Subfolders, to set the minimal permissions useful to the recipient.
- Click the Share button at the top of the sharing dialog.
At this point, the user you have invited to share the file/folder will get an email telling them about the share.
If you go back to the green cogwheel, and select Manage Access, you’ll see the status of the user listed as Pending.
Accepting a share
Before you can access the shared file or folder, you need to accept the invitation to share.
To do that:
- Log in to the MFT server, as described above (if this is the first time, you’ll end up in the registration page).
- Find the file/folder in the list of Shared files
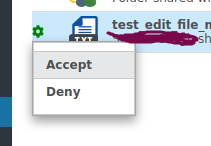
- Click the green cogwheel …
- … and select Accept.
This will make the file/folder accessible under the “File” view, so to download it, you must open it there.
Things to look out for
- The top menu Share button will share the entire folder, regardless of eventual check-marks in folder view. This may cause you to share more than you intended.
- The Applet button does not work (and will never work).
- The “Files” view to the left only shows folders and …
- … the “Shared Files” view is a flat list of all the shared files and folders, both the ones you manage, and the ones that someone else has invited you to share. It is here you can accept or decline an invitation to share a file/folder, and you can also manage permissions, but …
- … it’s unclear if managing permissions for already shared files/folders does work, and
- … you can not download files from the “Shared Files” view — for that you have to find the file/folder in the “Files” view.
- In the “Shared Files” view, the shares will still be listed after the file itself has been deleted from the server — only when you (with files you have shared) remove all users from the access list will the listing of the file/folder go away. Likewise if you are on the receiving end, only when you remove your own access will it go away. The green cogwheel is where you do this.