Content
- Introduction
- UPPMAX HPC systems
- Monitoring disk quota and core hour quota
- Interactive session
- Submitting batch jobs
- Using scratch
- Monitoring efficient of batch and interactive jobs
- Questions
1. INTRODUCTION
UPPMAX (Uppsala Multidisciplinary Center for Advanced Computational Science) is Uppsala University’s high performance computing (HPC) system that our group uses to run heavy computations requiring many processors and/or huge memory. If your computations are not intense you can use your PC. To run less heavy computations, consider other HPC systems such as skjold. We try to following below rules/suggestion when running jobs on Uppmax:
- Use “core” partition and avoid using “node” partition
There are three different cluster computing systems in UPPMAX: Milou, Tintin, and Halvan. Each system has several nodes (computer units) and each node has 16 cores (except for Halvan). Use “node” partition only if you really intend to use exactly n*16 cores (n=1,2,…) from the specified node(s) or if you are reserving >=256 GB of memory for your computation job. Use the “node” partition very considerably and it is better to get approval from your supervisor before using “node” partition. In a normal situation, always use “core” partition and specify the number of cores you use. - Your project pays for every minute and every processor you use Each month your project spends the budget to get 2000 core hours. So, please be really considerate on the number of processors (cores) and duration (walltime) when using UPPMAX. Make sure the number of cores does not exceed the requirement of your computation. Make sure the walltime is slightly bigger than its real runtime, because if you set 5 hours of walltime for a 6 hours job, you might get timeout and waste 5 core hours, times the number of cores you book, for no result at all. But if the walltime is too big, your job is put on very low priority.
- Use batch jobs and avoid using interactive session if necessary Batch job is a recommended way to run a computation job requiring many processors, by submitting a script file to the cluster. An interactive session allows you to skip writing a script file and manually write and execute commands on a multiple processors environment. Interactive session should only be used for development, debugging, and testing. When you are not optimally using the processor (i.e. idle, or editing scripts, or executing 4 cores computation when you reserve for 8 cores) in the interactive session, you are wasting the project’s core hour. Be wise in reserving the cores and walltimes when you use interactive session.
- Use scratch directory when you produce huge temporary files The disk space for our project (/proj/b2012036) is limited. Use it only to store the output data and the frequently accessed input data. If your computational job produces gigantic-sized temporary or intermediate files, then you really need to write a script for that job, adding some lines to divert the intermediate output files to the scratch directory, which has very huge disk space, and to move the final output files back to your project directory.
2. UPPMAX HPC SYSTEMS
There are three HPC systems we can use in UPPMAX, depending on the computational resource you need.
- Tintin (tintin.uppmax.uu.se)
Tintin has 144 nodes with 64 GB memory, 16 with 128 GB, and 4 with GPU graphics card. - Milou (milou.uppmax.uu.se)Milou has 174 nodes, each node has 128 GB, thus each core is assigned to 8 GB. Additionally, milou has 17 extra “medium” (256 GB) and 17 “fat” (512 GB) nodes. To reserve those medium and fat nodes, a special parameter needs to be added. If you need more memory (up to 2 TB), use Halvan instead. Beware that codes you compile on Tintin may not run in Milou, and vice versa, so it’s better to stay on Milou/Tintin, otherwise you might need to recompile in this case.
- Halvan (halvan.uppmax.uu.se)Halvan has 1 compute server, consisting of eight 8-core processors (=64 cores), and 2 TB shared memory, plus very fast scratch file system.
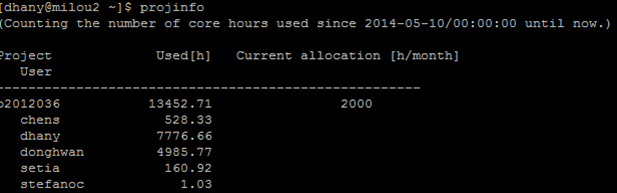
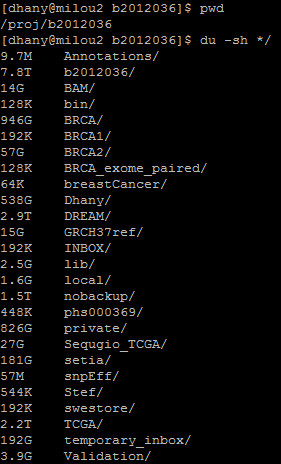
3. MONITORING DISC QUOTA & CORE HOUR QUOTA
It is important to regularly check the disk quota and core hour quota to see whether you are close or far from the limit. These are the commands:
uquota: check disc quota

projinfo: check core hour quota
If your core hour quota exceeds the limit, all of your jobs will be put in lower queue priority. So, make sure you check the core hours regularly and be wise on planning the job submission.
projplot -A <projnumber> : yields a plot of core hour usage over a period

du -skh */: checks which directories are filling up project space
4. INTERACTIVE SESSION
Remember that interactive session is only used for development, debugging, and testing. Running interactive session while urging for high priority (i.e. to start your interactive session immediately) and avoiding the use of too many core hours is very tricky. When you develop a program and want to debug/test, you often need interactive session with higher priority than the sbatch jobs. Here are some strategies to run interactive session efficiently:
- Use –qos=short for a 15-minutes interactive job
This gives you VERY high priority but very short time to debug your code using up to 64 cores (4 nodes) and maximum 2 qos-short jobs can be run at the same time. This is of course only feasible for development and debugging, not for testing a long-running code, but it is useful if you want to debug your code in multicore environment when the queueing system is very crowded. The command is as follow:
interactive -A b2012036 -p core -n 4 -t 15:00 --qos=short- Use -p devcore for a 1-hour interactive “core” job
If 15 minutes isn’t enough and you prefer running a “core” job (e.g. you want to use 2 or 4 cores in 1 hour), then you can reserve another high priority job named “devcore”.interactive -A b2012036 -p devcore -n 2 -t 1:00:00 - Use -p devel for a 1-hour interactive “node” job
If 15 minutes isn’t enough for you and you prefer running a “node” job (e.g. you want to use 15 or 30 cores in 1 hour), then you can reserve another high priority job named “devel”:interactive -A b2012036 -p devel -n 16 -t 1:00:00 - If you don’t understand the difference between core and node, or if you don’t really need to use a whole node, please use devcore instead of devel.
So, what’s the difference between “-p devcore -n 16” and “-p devel -n 16”? They are exactly the same. - If you REALLY need more than 1 hour of an interactive session, then you can use the usual parameters, i.e. -p core or -p node, according to your need. Here, you will have the same queueing priority with the sbatch jobs.
- Reserve as small walltime as possible and avoid writing codes or being idle when you are opening an interactive session. Also, when you reserve several cores for an interactive session, always ask yourselves: “Can the number of cores be reduced?” When the interactive session starts, the “billing” starts. So, when you finish using interactive session but you still have time, you should exit immediately.
5. SUBMITTING BATCH JOBS
If your scripts are guaranteed to work without errors in the node, run your scripts as batch jobs. To make sure your scripts are ready for a batch job, try one script as an interactive job before executing hundreds of similar jobs as batch jobs. Here is an example of simple job submission.
sbatch -A b2012036 -p core -n 4 -t 1:00:00 -J jobname your_script_file.shIn this example, you reserve 4 cores (-p core -n 4) for your_script_file.sh to be run in at most 1 hour (-t 1:00:00) and you name your job “jobname”. If you specify the walltime (i.e. -t) longer, you have a higher chance to finish your jobs as your job might finish longer than what you expected. For instance, if this job finishes within 30 minutes, you use 2 core hours (i.e. 4*.5 = 2), and it’s good. But if your job actually finishes in 2 hours (and stopped in the middle of running due to limited walltime), you are wasting 4 core hours for nothing and you have to resend your job using longer walltime anyway. If you assign longer walltime, it is wise for core hour quota, but your job will be put in lower priority than jobs with shorter walltime. Therefore, to use UPPMAX efficiently you must assign the walltime of your job “just over” the predicted duration of your job.
The general command is sbatch [options] your_script_file.sh, where options are parameters for job submissions separated by space, and you should prepare a job submission.
There are some parameters you need to know in batch job submission:
- -p
Always use “-p core” (i.e. “core” job). Use “-p node” (i.e. “node” job, or booking a node/some nodes) only when you want to run on more than one nodes with less than 16 cores per node. For example, if you want to run 30 cores on two nodes (i.e. 16+14=30), then write “-p core -n 30”, but if you want to run 15+15=30 cores, then write “-p node -N 2 -n 30”. So if you need 16 cores in one node for your job, just specify “-p core -n 16”. If you need to run a “node” job requiring 128 GB per node, then you must use “-C mem” option. If you need to run a “core” job requiring more than (8*number_of_core) GB, it is recommended to use Halvan, so that you will not waste core hours while reserving bigger RAM. - -n
Number of cores - -N
Number of nodes - -t
Walltime, i.e. maximum duration of your job. The format is d-hh:mm:ss - –mail-type=ALL
You can choose between BEGIN (send email when the job begins), END (send email when the job finishes), FAIL (send email when the job fails), and ALL (send email for those occasions). - –mail-user=your.email@ki.se
- -J
Job name (max 8 digits), to remind yourself and to tell people, which job is which. - -C memXXXGB
Custom RAM for your job. Remember that in Milou 1 core = 8 GB, except for the medium and fat nodes, which are up to 256 GB per node and up to 512 GB per node, respectively. XXX is the memory requirement after multiplied by the number of reserved cores/nodes. - -C usage_mail
If you specify this, you will get an email on how much resource you spend on that job, so the next time you run the similar job you can reserve for the right number of cores and memory. If you want to specify the memory and usage_mail at the same time, you can write the parameter as such: -C “memXXXGB&usage_mail”.
To see the list of jobs currently running or in the queue, type:
squeue -u yourusernameTo cancel specific jobs, execute scancel, followed by the job ID retrieved from squeue:
scancel 123456Or to cancel all jobs:
scancel -u yourusername6. USING SCRATCH
Everytime you are in an interactive session or in a batch session, a large temporary directory (i.e. the directory name equals to your job id) in /scratch is created just for your session, and this directory is deleted when you finish the session. So, in your script you may create large temporary/intermediate files, keep only the important files at the end, and remove the huge, unused temporary files. An environment variable $SNIC_TMP is created as an alias to your scratch folder, so you don’t need to always monitor the name of the directory. And remember that as long as the results are still questionable or can be changed later, you MUST put them in /proj/b2012036/nobackup/, not in /proj/b2012036.
This is an example on running SOMAC using 16 cores in Milou.
nobackup="/proj/b2012036/nobackup/mutations"
somac="/proj/b2012036/SOMAC"
dreamdata="/proj/b2012036/DREAM/Synthetic/Data"
mkdir -p $nobackup/dataset2_splitchr
mkdir -p $nobackup/dataset2_script
mkdir -p $nobackup/dataset2_result
eval sbatch -A b2012036 -p core -n 16 -t 5:00:00 --mail-user=dhany.saputra@ki.se --mail-type=ALL -J divide $somac/divide file1=$dreamdata/synthetic.challenge.set2.tumor.bam file2=$dreamdata/synthetic.challenge.set2.normal.bam chr=1-22,X,Y output=/proj/b2012036/nobackup/mutations/dataset2_splitchr
sleep 5; while squeue -u dhany | grep -q 'divide'; do counter=`expr $counter + 5`; if [[ $(( $counter % 60 )) == 0 ]];then echo "BAM splitting time elapsed = $(( $counter / 60 )) min"; fi; sleep 5; done; counter=`expr $counter + 5`; echo "Time elapsed for BAM splitting = $counter seconds"
cp $somac/config.cfg $nobackup/config.TN2
vi $nobackup/config.TN2 # Modify config.TN2 to use 8 cores (i.e. 8 for tumor file, 8 for normal file) and include $SNIC_TMP here
for i in {1,22,Y}
do
echo '#!/bin/bash -l' > $nobackup/dataset2_script/$i.txt
echo 'cp '$nobackup'/dataset2_splitchr/synthetic.challenge.set2.tumor.'$i'.bam $SNIC_TMP' >> $nobackup/dataset2_script/$i.txt
echo 'cp '$nobackup'/dataset2_splitchr/synthetic.challenge.set2.normal.'$i'.bam $SNIC_TMP' >> $nobackup/dataset2_script/$i.txt
echo 'cd '$somac >> $nobackup/dataset2_script/$i.txt
echo 'bash somac '$nobackup'/config.TN2 '$i >> $nobackup/dataset2_script/$i.txt
echo 'mv $SNIC_TMP/* '$nobackup'/dataset2_result' >> $nobackup/dataset2_script/$i.txt
eval sbatch -A b2012036 -p core -n 16 -t 24:00:00 --mail-user=dhany.saputra@ki.se --mail-type=ALL -J chr$i $nobackup/dataset2_script/$i.txt
done
These lines of command really depend on your case, so it’s not even a template, it’s just an example. The important commands in SOMAC lie on lines 7 (run divide) 10 (edit config) and 17 (run somac), but the rules regarding scratch, nobackup, and uppmax require us to write these 20 lines. Running a program in parallel on UPPMAX requires basic knowledge on Bash scripting, such as file copying and moving, using environment variables and arithmetical operators, looping, using conditional if-else, and so on.
The full explanation on different disk storage guide can be found here.
7. MONITORING THE EFFICIENCY OF YOUR BATCH/INTERACTIVE JOBS
It is also important to review the batch jobs you have submitted, so that you can revise your scripts and job submission parameters to eventually utilize N cores with nearly 100% CPU usage for each core.
- To find out our project’s usage of uppmax resources in the last 30 days:
finishedjobinfo b2012036The information provided by this command is the Job ID, the job status (jobstate=COMPLETED/FAILED/TIMEOUT/CANCELLED), who submits the job (username), number of processors (procs), partition (node/core), maximum memory usage of that job (maxmemory_in_GiB), when the job is submitted (submit_time), the runtime, and the queuetime.

- To find out whether your batch/interactive job wastes the project’s core hour for nothing:
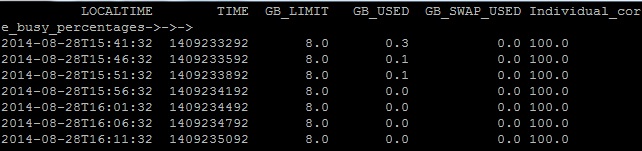
less /sw/share/slurm/milou/uppmax_jobstats/*/yourjobidEverytime you submit a batch/interactive job, you get a job ID. Replace “yourjobid” with that job ID to profile the CPU core usage of that job. See these two examples:
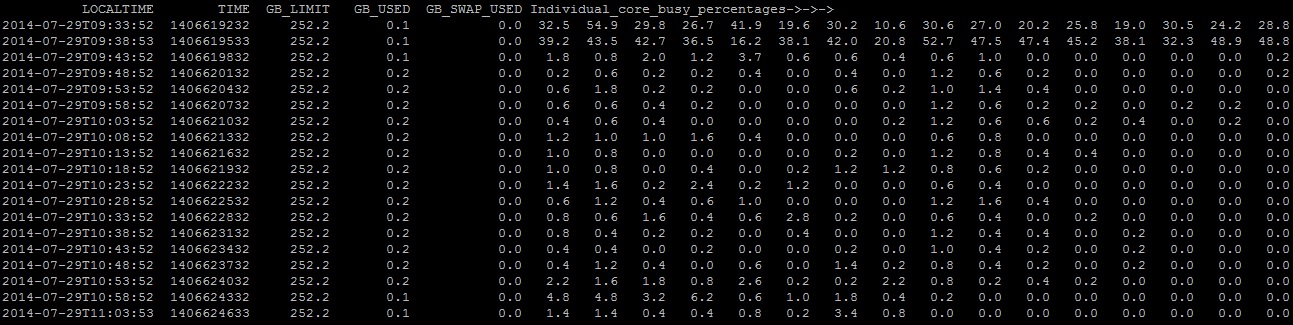
The job in the above example uses 16 cores, thus the last 16 columns are the %CPU utilization for each core. Different rows show %CPU utilizations after every 5 minutes. Here’s another example of 100% CPU usage on 1 core:
What if your submitted a multicore batch job has nearly 100% on 2 columns and nearly 0% on the other columns? It means that your script only uses 2 cores. Then you might want either to change your batch job submission parameters or to edit your script to make the CPU cores more occupied. - To look at the efficiency plots using jobstats tool
In this section, we briefly introduce how to use the jobstats tool for our project. Details of how to use the tool are available at http://www.uppmax.uu.se/discovering-job-resource-usage-with-jobstats# connect to uppmax with Xforwarding $ ssh -Y username@milou.uppmax.uu.se # run the jobstats tool for the project $ jobstats -p -A b2012036 # view the images $ eog milou-b2012036-*then use the arrow keys to see job-by-job. An example of the images is shown below. This image presents the usage of Tophat with the setting of 16 cores for parallel computing.
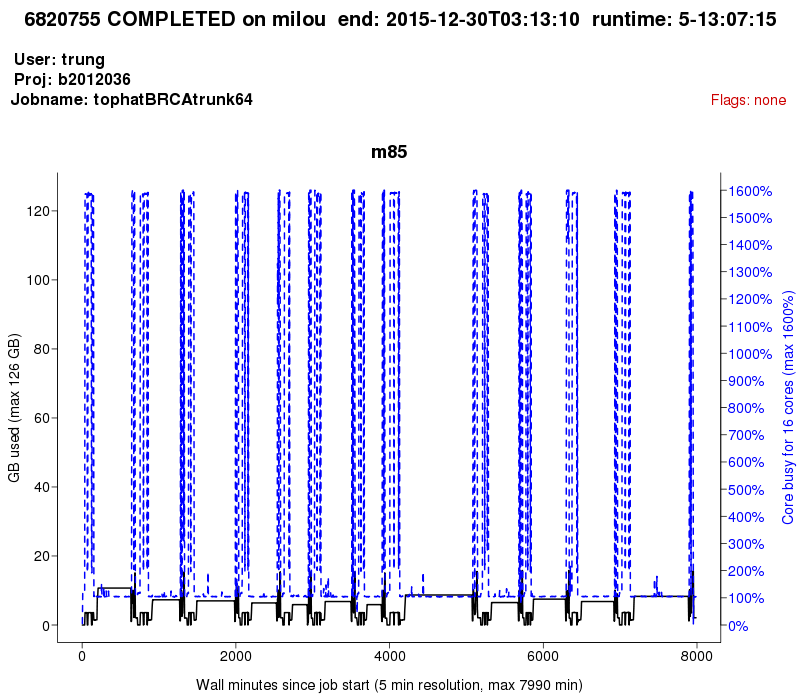
An example of core-hour usage plot
- To efficiently run Tophat for optimised core-hour usage
As suggested from UPPMAX supporters, we should set 04 cores for each sample instead of 16 cores. Thus, the run-time for individual sample would be slightly longer, but total time to finish all samples will faster. As we can see in the core-hour usage plot of the previous section, Tophat allows parallel computing (16 cores) in few steps of its pipeline that makes a lot of core-hours wasted. If reducing16 cores to 4 cores, Tophat would have used ~25% of core-hours only.
8. TECHNICAL QUESTIONS
TrungNghia.Vu@ki.se
Pingback: SOMAC: SOmatic MutAtion Caller | Biostat Wiki
Pingback: Sequgio | Biostat Wiki
Pingback: Gregory Smith